One humble rosemary plant on the windowsill can quietly become a whole mini plantation-if you handle its shoots the right way.
Garden centers would rather you kept buying new pots every spring, but patient home gardeners are doing something else with a glass of water, a sharp pair of scissors, and a bit of sunlight.
Why propagating your own rosemary is worth it
Rosemary (Salvia rosmarinus) is one of those herbs that disappears quickly once you start using it regularly. Whole sprigs go into roasting pans, sauces, marinades, and even cocktails. Buying fresh bunches adds up fast, and grocery-store “living herb” pots rarely last long on a kitchen counter.
Propagating your own plants changes that. One strong mother plant can provide a steady supply of new plants at almost no cost. You get the reliable flavor you already love-and you avoid the disappointment of weak, generic store-bought herbs that die after two weeks indoors.
By turning one mature rosemary plant into several younger copies, you preserve the exact aroma you like while cutting future costs to nearly zero.
There’s a climate benefit, too. Home propagation means less plastic, less transportation, and fewer impulse purchases that end up in the compost. For balcony gardeners and anyone with a sunny window, learning to multiply one hardy herb makes a small but real difference in how often you can cook with something truly fresh.
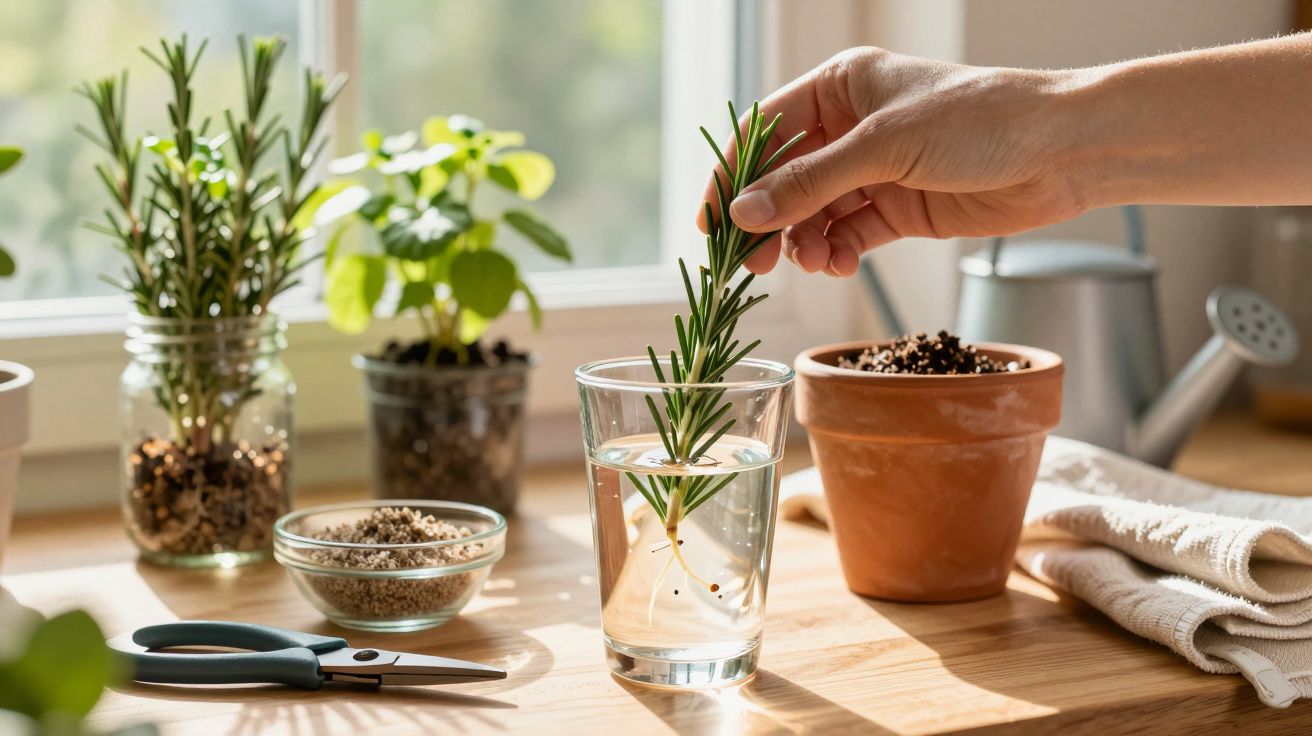
The basic trick: water first, soil later
The method making the rounds among hobby gardeners is deceptively simple, and it doesn’t start with seeds or traditional cuttings planted straight into soil. Instead, you encourage the plant to root in plain water first, then move it into a gritty potting mix once it shows signs of life.
Choosing the right shoots
Success starts with choosing the right part of the plant. You want shoots that are firm but still green and flexible-not the older woody stems near the base.
- Length: about 10–15 cm (4–6 inches) per shoot
- Texture: fresh and green, not stiff and bark-like
- Health: no yellowing needles, no dark spots, no signs of mold
Use clean, sharp scissors or pruning shears and snip just above a leaf node so the mother plant can branch again. This keeps the original rosemary compact and encourages new growth while you harvest future “baby plants.”
Preparing the shoots for rooting
Once cut, strip the needles from the lower section of each shoot. This is where roots will form.
Remove all needles from the bottom third of the shoot so bare stem sits in the water and future roots have room to grow.
Fill a clean glass or small jar with lukewarm water. Cold tap water won’t necessarily ruin the process, but starting slightly warm reduces shock to the plant tissue.
Place the prepared shoots in the glass so only the bare stem is submerged. The leafy tops should stay dry and above the rim. Then move the glass to a bright spot with indirect light-behind a curtain or on a shelf away from direct midday sun. Strong sun at this stage dries the needles and heats the water too quickly.
From a glass of water to a rooted plant
Now comes the part gardeners either love or hate: waiting. The stems can sit for several weeks with little visible change at first.
Changing the water and spotting early roots
Every two days, pour out the old water and refill the glass. This keeps bacteria and algae under control and gives the shoots more oxygen around the developing roots.
Sometime between week four and week eight, fine white roots will start to appear on the submerged stem. At first they may look like tiny threads.
As soon as several roots are at least 1–2 cm long, the shoot is ready to move into soil and grow like a normal young plant.
If nothing happens after eight weeks, the shoot likely wasn’t vigorous enough from the start. It’s usually faster to begin again with a fresher cutting than to keep waiting.
Potting up: the soil rosemary actually wants
Once roots appear, the water has done its job. The new plants need air around the roots and fast drainage. Standard bagged potting soil alone is often too dense and stays wet too long.
Mixing a fast-draining potting mix
A simple mix works well:
- 1 part garden soil or all-purpose potting mix
- 1 part coarse sand or fine grit
This blend holds enough moisture for new roots while letting excess water drain quickly. Choose pots at least 15 cm (6 inches) deep with a drainage hole. Rosemary grows into a small shrub and benefits from extra depth from the start.
| Step | What to do | Why it matters |
|---|---|---|
| 1 | Add a drainage layer (pebbles or a broken pot shard) at the bottom | Prevents water from collecting around roots |
| 2 | Fill the pot with the sand–soil mix, leaving a small hollow | Makes space for the rooted stem |
| 3 | Place the rooted stem in the hollow, roots spread out | Helps the plant anchor quickly |
| 4 | Backfill gently and press the soil lightly | Removes air pockets around the roots |
| 5 | Water once, then let the surface dry slightly | Encourages roots to grow deeper |
Set the pot in a sunny location that gets six to eight hours of light per day. A south-facing windowsill, a bright balcony, or a sheltered patio are all ideal-as long as the pot doesn’t sit in standing water after rain.
Keeping your new rosemary plants thriving
Once potted, young rosemary behaves much like its parent: it loves sun, hates soggy soil, and prefers careful pruning over heavy cutting.
Pruning and feeding without stressing the plant
- Never remove more than about one-third of the foliage at a time. Big cuts slow growth and stress the plant.
- Use the trimmings in the kitchen, then let the plant recover before the next major harvest.
- Feed lightly with an organic fertilizer-compost or a mild liquid feed-during the growing season.
Watch the needles for early warning signs. If they turn yellow or start dropping heavily, the plant may not be established yet. This often points to waterlogged soil or roots damaged during transplanting.
Yellowing or dropping needles usually mean the young rosemary hasn’t settled in; starting over with a fresh, vigorous shoot is often faster than trying to rescue a struggling one.
Why gardeners keep coming back to this method
Gardeners who use the “water first, pot later” method tend to stick with it for a few reasons:
- Lower cost: One original plant can supply herbs and new plants for years without repeat purchases.
- Consistent flavor: Because the plants are clones, the aroma stays true to the rosemary you liked.
- Faster harvest: Water-rooted cuttings often reach usable size sooner than seedlings.
- Works anywhere: A kitchen shelf, a student balcony, or a full garden all work.
- Less waste: Fewer plastic pots and less packaging than buying herbs repeatedly.
Common pitfalls and how to avoid them
This method is forgiving, but a few issues come up regularly for beginners.
Too much sun, too much water
During the water phase, placing the glass in direct sun is a common mistake. The water heats up quickly, algae grow, and the tender stems essentially “cook” instead of rooting. Bright, indirect light is safer.
Once the plants are in soil, treating rosemary like basil causes problems. Rosemary can handle short dry spells; constant moisture is worse. Let the top layer of soil dry before watering again.
When “woody” means “too late”
Gardeners sometimes choose thick, impressive-looking stems for propagation. Those older woody stems rarely root in water. They’re built to support the plant, not start a new one. Sticking with younger green growth dramatically improves your success rate.
Extra context: a few terms and tricks worth knowing
Two phrases appear often in guides but aren’t always explained clearly. “Well-drained soil” simply means potting mix that lets water move through quickly instead of holding it like a sponge. Mixing sand or grit into standard potting mix is an easy way to get that result in a container.
“Hardening off” is another. If your new rosemary has been indoors for weeks, move it outside gradually over about a week: first a couple hours in shade, then longer periods, then some direct sun. Going straight from a calm kitchen to a windy balcony can scorch the needles.
For cooks, there’s also a practical payoff. One original plant, regularly pruned for 10–15 cm (4–6 inch) shoots, can produce several rooted offshoots each year. Within two seasons you could have a small row of rosemary along a balcony railing-enough for roasts, focaccia, infused oils, and seasoned salts without ever stopping at the grocery herb section again.
And if you like low-effort experiments, this approach can translate surprisingly well to other woody Mediterranean herbs like lavender and sage. Each species has its own quirks, but the basic idea-fresh green shoot, time in water, a gritty potting mix, and plenty of sun-stays the same, turning one small purchase into a long-lasting, fragrant habit.


Comments
No comments yet. Be the first to comment!
Leave a Comment